Introduction
If you have shipped a retrieval-augmented generation (RAG) system in the last couple of years, you probably know the feeling. The demo is magical. You ask a question, the system finds a handful of similar paragraphs, and the model writes a confident answer. Then a real user asks something like, "Which of our services will break if we retire the payments v1 API, and who owns them?" and the magic disappears.
The answer to that question is not sitting in one paragraph. It is scattered across a migration doc, a service catalog, an on-call rota and three incident reports. Vector search can find paragraphs that sound like your question, but it has no idea how those paragraphs relate to each other.
That gap is exactly what Graph RAG closes. Instead of treating your knowledge base as a bag of text chunks, you also model it as a graph of entities (services, teams, people, systems) and relationships (OWNS, DEPENDS_ON, REPLACED_BY). At query time, you combine semantic similarity with graph traversal, and the model gets context that is both relevant and connected.
In this guide, I will walk you through building the whole thing end to end, the way I would build it for a real client:
- A sovereign LLM layer using LangChain and Ollama, so no data leaves your infrastructure
- A PostgreSQL knowledge graph with pgvector for embeddings and recursive CTEs for traversal
- A Node.js and Express.js REST API with validation, rate limiting and an ingestion endpoint
- A Next.js, TypeScript, Tailwind CSS and Shadcn UI frontend that shows answers, sources and the entities behind them
- Docker, Nginx and GitHub Actions to ship it all to an AWS Linux server
You do not need prior graph database experience. If you are comfortable with TypeScript and SQL, you are ready.
Why Basic Vector Search Is Not Enough
Vector search is brilliant at one thing: finding text that is semantically close to a query. It struggles when the answer depends on structure.
Here are the failure modes I see most often in production:
- Multi-hop questions. "Who manages the team that owns the billing database?" requires following two or three links. No single chunk contains the full chain.
- Entity ambiguity. "Atlas" might be a project, a database cluster and a person's nickname. Embeddings blur them together.
- Fragmented context. Relevant facts are spread across many documents, and top-k similarity only returns the loudest few.
- Missing explainability. When a stakeholder asks "why did the model say that?", a list of similar chunks is a weak answer.
Graph RAG addresses each of these by keeping explicit, queryable relationships alongside your embeddings.
| Capability | Vector RAG | Graph RAG |
|---|---|---|
| Finds semantically similar text | Excellent | Excellent |
| Answers multi-hop questions | Poor | Strong |
| Disambiguates entities | Weak | Strong |
| Explains retrieval path | Limited | Clear (entities and edges) |
| Setup complexity | Low | Medium |
The extra complexity is real, but it is manageable, and PostgreSQL keeps it much smaller than you might expect.
Core Concepts You Need Before Writing Code
Let me define the moving parts so the rest of the tutorial reads smoothly.
Entities and relationships
An entity is a named thing: a service, a team, a person, a vendor, a document. A relationship is a typed, directed edge between two entities, such as payments-api DEPENDS_ON ledger-db. During ingestion, an LLM reads each chunk and extracts these as structured data.
Hybrid retrieval
Our retrieval step has two phases:
- Seed retrieval. Embed the question and find the top-k most similar chunks with pgvector.
- Graph expansion. Look up the entities mentioned in those seed chunks, walk a couple of hops across the relationship table, and pull in the neighbouring entities, edges and supporting chunks.
The final prompt contains passages, entities and relationships, so the model reasons over connected facts rather than isolated text.
Why PostgreSQL
I am a big believer in boring technology for enterprise systems. PostgreSQL gives you ACID transactions, mature backup tooling, row-level security and a huge hiring pool. With the pgvector extension it handles embeddings, and with recursive common table expressions (CTEs) it handles graph traversal. One database, one backup strategy, one thing to monitor.
Why a local LLM
For many organisations, especially in finance, healthcare and government, sending internal documents to a third-party API is a non-starter. Ollama lets you run open-weight models on your own hardware and exposes a simple HTTP API that LangChain already supports. That is what I mean by sovereign: your data, your models, your network boundary.
Architecture Overview
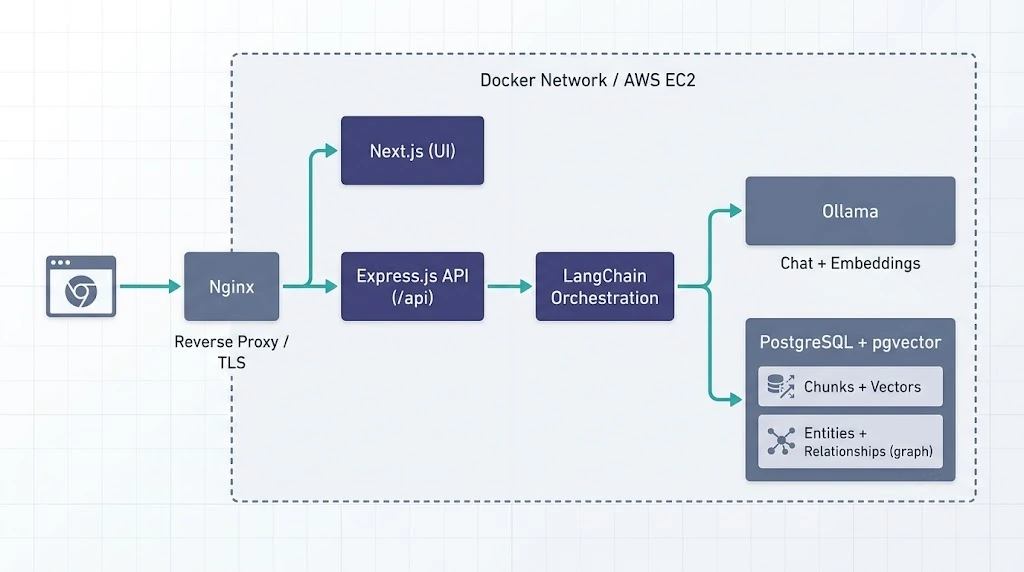
Here is the full picture. Requests enter through Nginx, which routes the UI to Next.js and /api traffic to Express. Express orchestrates LangChain, which talks to Ollama for generation and embeddings and to PostgreSQL for storage and retrieval.
And here is the project layout we will build:
graph-rag/
├── api/
│   ├── src/
│   │   ├── lib/        # db.ts, llm.ts
│   │   ├── services/   # ingest.ts, retrieve.ts, answer.ts
│   │   └── server.ts
│   ├── Dockerfile
│   └── package.json
├── web/
│   ├── app/            # Next.js App Router
│   ├── components/ui/  # Shadcn components
│   ├── Dockerfile
│   └── package.json
├── db/init.sql
├── nginx/default.conf
├── docker-compose.yml
└── .github/workflows/deploy.yml
Step 1: Spin Up PostgreSQL and Ollama
Start with the infrastructure. The pgvector/pgvector image ships PostgreSQL with the extension preinstalled, which saves you from compiling anything.
# docker-compose.dev.yml
services:
  db:
    image: pgvector/pgvector:pg16
    environment:
      POSTGRES_USER: graphrag
      POSTGRES_PASSWORD: change-me
      POSTGRES_DB: graphrag
    ports:
      - "5432:5432"
    volumes:
      - pgdata:/var/lib/postgresql/data
      - ./db/init.sql:/docker-entrypoint-initdb.d/init.sql

  ollama:
    image: ollama/ollama:latest
    ports:
      - "11434:11434"
    volumes:
      - ollama:/root/.ollama

volumes:
  pgdata:
  ollama:
Then pull the two models we need: a chat model for extraction and answers, and an embedding model.
docker compose -f docker-compose.dev.yml up -d
docker compose -f docker-compose.dev.yml exec ollama ollama pull llama3.1:8b
docker compose -f docker-compose.dev.yml exec ollama ollama pull nomic-embed-text
nomic-embed-text produces 768-dimensional vectors, which matters in the next step.
Step 2: Design the Knowledge Graph Schema
This is the heart of the system, so take your time here. We store documents and chunks, then entities, then the edges between them.
-- db/init.sql
CREATE EXTENSION IF NOT EXISTS vector;

CREATE TABLE documents (
  id         UUID PRIMARY KEY DEFAULT gen_random_uuid(),
  title      TEXT NOT NULL,
  source     TEXT,
  created_at TIMESTAMPTZ NOT NULL DEFAULT now()
);

CREATE TABLE chunks (
  id          UUID PRIMARY KEY DEFAULT gen_random_uuid(),
  document_id UUID NOT NULL REFERENCES documents(id) ON DELETE CASCADE,
  position    INT  NOT NULL,
  content     TEXT NOT NULL,
  embedding   vector(768) NOT NULL
);

CREATE INDEX chunks_embedding_idx
  ON chunks USING hnsw (embedding vector_cosine_ops);

CREATE TABLE entities (
  id             UUID PRIMARY KEY DEFAULT gen_random_uuid(),
  name           TEXT NOT NULL,
  canonical_name TEXT NOT NULL,
  type           TEXT NOT NULL,
  description    TEXT,
  UNIQUE (canonical_name, type)
);

CREATE TABLE relationships (
  id         UUID PRIMARY KEY DEFAULT gen_random_uuid(),
  source_id  UUID NOT NULL REFERENCES entities(id) ON DELETE CASCADE,
  target_id  UUID NOT NULL REFERENCES entities(id) ON DELETE CASCADE,
  predicate  TEXT NOT NULL,
  weight     INT  NOT NULL DEFAULT 1,
  UNIQUE (source_id, target_id, predicate)
);

CREATE INDEX relationships_source_idx ON relationships (source_id);
CREATE INDEX relationships_target_idx ON relationships (target_id);

CREATE TABLE chunk_entities (
  chunk_id  UUID NOT NULL REFERENCES chunks(id) ON DELETE CASCADE,
  entity_id UUID NOT NULL REFERENCES entities(id) ON DELETE CASCADE,
  PRIMARY KEY (chunk_id, entity_id)
);

CREATE INDEX chunk_entities_entity_idx ON chunk_entities (entity_id);
A few design decisions worth explaining:
canonical_nameis the lower-cased, trimmed version of the name. It is how we merge "Payments API" and "payments api" into one node.weightcounts how many times we saw the same edge. Frequently repeated relationships are usually more trustworthy, and we use that for ranking later.- The HNSW index gives fast approximate nearest-neighbour search. It is the sensible default for most workloads in 2026, and it does not need a training step like IVFFlat does.
- Two indexes on
relationshipskeep traversal fast in both directions.
Step 3: Connect LangChain to Ollama
Now the API. Initialise a TypeScript project inside api/ and install the dependencies:
npm init -y
npm i express pg zod helmet cors express-rate-limit \
  @langchain/core @langchain/ollama @langchain/textsplitters
npm i -D typescript tsx @types/node @types/express @types/pg @types/cors
Keep the model wiring in one small file so you can swap models without touching business logic.
// api/src/lib/llm.ts
import { ChatOllama, OllamaEmbeddings } from "@langchain/ollama";

const baseUrl = process.env.OLLAMA_BASE_URL ?? "http://localhost:11434";
const chatModelName = process.env.CHAT_MODEL ?? "llama3.1:8b";

export const chatModel = new ChatOllama({
  baseUrl,
  model: chatModelName,
  temperature: 0.1,
});

// Extraction should be as deterministic as possible.
export const extractorModel = new ChatOllama({
  baseUrl,
  model: chatModelName,
  temperature: 0,
});

export const embeddings = new OllamaEmbeddings({
  baseUrl,
  model: process.env.EMBED_MODEL ?? "nomic-embed-text",
});
// api/src/lib/db.ts
import { Pool } from "pg";

export const pool = new Pool({
  connectionString: process.env.DATABASE_URL,
  max: 10,
});
Step 4: Build the Ingestion Pipeline
Ingestion has four jobs: split the text, embed each chunk, extract entities and relationships with the LLM, and write everything to PostgreSQL.
The trick with local models is structured output. Free-form text extraction is fragile, so we describe the shape we want with Zod and let LangChain enforce it.
// api/src/services/ingest.ts
import { z } from "zod";
import { ChatPromptTemplate } from "@langchain/core/prompts";
import { RecursiveCharacterTextSplitter } from "@langchain/textsplitters";
import { pool } from "../lib/db.js";
import { embeddings, extractorModel } from "../lib/llm.js";

const GraphSchema = z.object({
  entities: z.array(
    z.object({
      name: z.string().min(1),
      type: z.enum(["SERVICE", "TEAM", "PERSON", "SYSTEM", "DOCUMENT", "OTHER"]),
      description: z.string().default(""),
    })
  ),
  relationships: z.array(
    z.object({
      source: z.string().min(1),
      target: z.string().min(1),
      predicate: z.string().min(1),
    })
  ),
});

type GraphData = z.infer<typeof GraphSchema>;

const extractionPrompt = ChatPromptTemplate.fromMessages([
  [
    "system",
    "You extract knowledge graphs from enterprise documentation. " +
      "Only include entities that are explicitly named in the text. " +
      "Use short canonical names. Write predicates in UPPER_SNAKE_CASE, " +
      "for example OWNS, DEPENDS_ON, REPLACED_BY or MANAGES. " +
      "If the text contains no clear entities, return empty arrays.",
  ],
  ["human", "{text}"],
]);

const extractor = extractionPrompt.pipe(
  extractorModel.withStructuredOutput(GraphSchema, { name: "graph_extraction" })
);

async function extractGraph(text: string): Promise<GraphData> {
  try {
    return await extractor.invoke({ text });
  } catch (err) {
    // A single bad extraction should never kill the whole ingestion run.
    console.warn("Extraction failed for a chunk, skipping graph data", err);
    return { entities: [], relationships: [] };
  }
}

const canonical = (name: string) => name.trim().toLowerCase().replace(/\s+/g, " ");
const toVector = (v: number[]) => `[${v.join(",")}]`;

export async function ingestDocument(title: string, source: string, text: string) {
  const splitter = new RecursiveCharacterTextSplitter({
    chunkSize: 1000,
    chunkOverlap: 150,
  });
  const pieces = await splitter.splitText(text);
  const vectors = await embeddings.embedDocuments(pieces);

  // Do the slow LLM work BEFORE opening a transaction.
  const graphs: GraphData[] = [];
  for (const piece of pieces) graphs.push(await extractGraph(piece));

  const client = await pool.connect();
  try {
    await client.query("BEGIN");

    const doc = await client.query<{ id: string }>(
      "INSERT INTO documents (title, source) VALUES ($1, $2) RETURNING id",
      [title, source]
    );
    const documentId = doc.rows[0].id;

    for (let i = 0; i < pieces.length; i++) {
      const chunk = await client.query<{ id: string }>(
        `INSERT INTO chunks (document_id, position, content, embedding)
         VALUES ($1, $2, $3, $4::vector) RETURNING id`,
        [documentId, i, pieces[i], toVector(vectors[i])]
      );
      const chunkId = chunk.rows[0].id;

      const idByName = new Map<string, string>();

      for (const e of graphs[i].entities) {
        const row = await client.query<{ id: string }>(
          `INSERT INTO entities (name, canonical_name, type, description)
           VALUES ($1, $2, $3, $4)
           ON CONFLICT (canonical_name, type)
           DO UPDATE SET description = COALESCE(NULLIF(entities.description, ''), EXCLUDED.description)
           RETURNING id`,
          [e.name, canonical(e.name), e.type, e.description]
        );
        idByName.set(canonical(e.name), row.rows[0].id);
        await client.query(
          `INSERT INTO chunk_entities (chunk_id, entity_id)
           VALUES ($1, $2) ON CONFLICT DO NOTHING`,
          [chunkId, row.rows[0].id]
        );
      }

      for (const r of graphs[i].relationships) {
        const s = idByName.get(canonical(r.source));
        const t = idByName.get(canonical(r.target));
        if (!s || !t || s === t) continue; // drop dangling edges and self-loops
        await client.query(
          `INSERT INTO relationships (source_id, target_id, predicate)
           VALUES ($1, $2, $3)
           ON CONFLICT (source_id, target_id, predicate)
           DO UPDATE SET weight = relationships.weight + 1`,
          [s, t, r.predicate.trim().toUpperCase()]
        );
      }
    }

    await client.query("COMMIT");
    return { documentId, chunks: pieces.length };
  } catch (err) {
    await client.query("ROLLBACK");
    throw err;
  } finally {
    client.release();
  }
}
Notice two small but important choices. We run extraction before opening the transaction, because a local model can take seconds per chunk and you do not want a database connection sitting idle that long. And we silently drop edges whose endpoints were not extracted as entities in the same chunk, which filters out a lot of hallucinated links.
Step 5: Hybrid Retrieval With Recursive CTEs
This is where Graph RAG earns its name. First, find the seed chunks with vector similarity. Then expand outwards through the graph.
// api/src/services/retrieve.ts
import { pool } from "../lib/db.js";
import { embeddings } from "../lib/llm.js";

const WALK_SQL = `
WITH RECURSIVE seed AS (
  SELECT DISTINCT entity_id FROM chunk_entities WHERE chunk_id = ANY($1::uuid[])
),
walk(id, depth, path) AS (
  SELECT entity_id, 0, ARRAY[entity_id] FROM seed
  UNION ALL
  SELECT n.next_id, w.depth + 1, w.path || n.next_id
  FROM walk w
  JOIN relationships r ON w.id IN (r.source_id, r.target_id)
  CROSS JOIN LATERAL (
    SELECT CASE WHEN r.source_id = w.id THEN r.target_id ELSE r.source_id END AS next_id
  ) n
  WHERE w.depth < $2 AND n.next_id <> ALL(w.path)
)
SELECT e.id, e.name, e.type, e.description, MIN(w.depth) AS depth
FROM walk w
JOIN entities e ON e.id = w.id
GROUP BY e.id
ORDER BY MIN(w.depth), e.name
LIMIT 40;
`;

export interface RetrievalResult {
  passages: { id: string; title: string; content: string; score: number }[];
  entities: { id: string; name: string; type: string; depth: number }[];
  relationships: { source: string; predicate: string; target: string }[];
}

export async function retrieve(question: string, k = 5, depth = 2): Promise<RetrievalResult> {
  const queryVector = `[${(await embeddings.embedQuery(question)).join(",")}]`;

  // 1. Seed retrieval with pgvector (cosine distance).
  const seeds = await pool.query(
    `SELECT c.id, d.title, c.content, 1 - (c.embedding <=> $1::vector) AS score
     FROM chunks c JOIN documents d ON d.id = c.document_id
     ORDER BY c.embedding <=> $1::vector
     LIMIT $2`,
    [queryVector, k]
  );
  const seedIds: string[] = seeds.rows.map((r) => r.id);
  if (seedIds.length === 0) return { passages: [], entities: [], relationships: [] };

  // 2. Graph expansion with a recursive CTE.
  const walked = await pool.query(WALK_SQL, [seedIds, depth]);
  const entityIds: string[] = walked.rows.map((r) => r.id);
  const neighbourIds: string[] = walked.rows.filter((r) => r.depth >= 1).map((r) => r.id);

  // 3. Edges between the entities we found.
  const edges = await pool.query(
    `SELECT s.name AS source, r.predicate, t.name AS target
     FROM relationships r
     JOIN entities s ON s.id = r.source_id
     JOIN entities t ON t.id = r.target_id
     WHERE r.source_id = ANY($1::uuid[]) AND r.target_id = ANY($1::uuid[])
     ORDER BY r.weight DESC
     LIMIT 50`,
    [entityIds]
  );

  // 4. Extra supporting passages that mention neighbouring entities.
  const extra = neighbourIds.length
    ? await pool.query(
        `SELECT DISTINCT c.id, d.title, c.content, 0.0 AS score
         FROM chunk_entities ce
         JOIN chunks c ON c.id = ce.chunk_id
         JOIN documents d ON d.id = c.document_id
         WHERE ce.entity_id = ANY($1::uuid[]) AND c.id <> ALL($2::uuid[])
         LIMIT 4`,
        [neighbourIds, seedIds]
      )
    : { rows: [] };

  return {
    passages: [...seeds.rows, ...extra.rows],
    entities: walked.rows,
    relationships: edges.rows,
  };
}
Let me unpack the recursive query, because it is the part people find intimidating. The seed CTE collects every entity mentioned in our top-k chunks. The walk CTE starts from those entities at depth 0, then repeatedly follows edges in either direction, increasing the depth each time. The path array tracks where we have already been so we never loop, and w.depth < $2 caps the number of hops. The final SELECT deduplicates entities and keeps the shallowest depth for each.
For a question about retiring the payments v1 API, the seed chunks mention payments-api. One hop out we find checkout-service and billing-worker. Two hops out we find the Growth Platform team that owns them. That chain never appeared in a single paragraph, but the graph assembled it for us.
Step 6: Generate Grounded Answers
With retrieval in place, answer generation is mostly about a disciplined prompt. We label each kind of context and tell the model to stay inside it.
// api/src/services/answer.ts
import { ChatPromptTemplate } from "@langchain/core/prompts";
import { StringOutputParser } from "@langchain/core/output_parsers";
import { chatModel } from "../lib/llm.js";
import { retrieve } from "./retrieve.js";

const prompt = ChatPromptTemplate.fromMessages([
  [
    "system",
    "You are an enterprise knowledge assistant. Answer ONLY using the context provided. " +
      "Use the relationships to connect facts across passages. " +
      "If the context does not contain the answer, say you do not know. " +
      "Cite passages by their number, like [1] or [2].",
  ],
  [
    "human",
    "Passages:\n{passages}\n\nEntities:\n{entities}\n\nRelationships:\n{relationships}\n\nQuestion: {question}",
  ],
]);

const chain = prompt.pipe(chatModel).pipe(new StringOutputParser());

export async function answerQuestion(question: string) {
  const ctx = await retrieve(question);

  const answer = await chain.invoke({
    question,
    passages: ctx.passages.map((p, i) => `[${i + 1}] (${p.title}) ${p.content}`).join("\n\n"),
    entities: ctx.entities.map((e) => `${e.name} (${e.type})`).join(", ") || "none",
    relationships:
      ctx.relationships.map((r) => `${r.source} -${r.predicate}-> ${r.target}`).join("\n") || "none",
  });

  return { answer, ...ctx };
}
Step 7: Expose Everything Through an Express REST API
The API layer should be thin: validate input, call the service, return JSON. I also add Helmet, rate limiting and a simple API key on the ingestion route, because you do not want strangers writing to your knowledge base.
// api/src/server.ts
import express from "express";
import helmet from "helmet";
import cors from "cors";
import rateLimit from "express-rate-limit";
import { z } from "zod";
import { answerQuestion } from "./services/answer.js";
import { ingestDocument } from "./services/ingest.js";
import { pool } from "./lib/db.js";

const app = express();
app.set("trust proxy", 1); // we sit behind Nginx
app.use(helmet());
app.use(cors({ origin: process.env.CORS_ORIGIN?.split(",") ?? false }));
app.use(express.json({ limit: "2mb" }));
app.use("/api/", rateLimit({ windowMs: 60_000, limit: 30, standardHeaders: true }));

app.get("/api/health", async (_req, res) => {
  await pool.query("SELECT 1");
  res.json({ status: "ok" });
});

const QuerySchema = z.object({ question: z.string().min(3).max(500) });

app.post("/api/query", async (req, res, next) => {
  try {
    const { question } = QuerySchema.parse(req.body);
    res.json(await answerQuestion(question));
  } catch (err) {
    next(err);
  }
});

const IngestSchema = z.object({
  title: z.string().min(1),
  source: z.string().default("manual"),
  text: z.string().min(20),
});

app.post("/api/ingest", async (req, res, next) => {
  try {
    if (req.header("x-api-key") !== process.env.INGEST_API_KEY) {
      return res.status(401).json({ error: "Unauthorized" });
    }
    const body = IngestSchema.parse(req.body);
    res.status(201).json(await ingestDocument(body.title, body.source, body.text));
  } catch (err) {
    next(err);
  }
});

app.use((err: unknown, _req: express.Request, res: express.Response, _next: express.NextFunction) => {
  if (err instanceof z.ZodError) {
    return res.status(400).json({ error: "Invalid request", details: err.issues });
  }
  console.error(err);
  res.status(500).json({ error: "Something went wrong" });
});

app.listen(Number(process.env.PORT ?? 4000), () => console.log("API ready"));
You can test it right away:
curl -X POST http://localhost:4000/api/query \
  -H "Content-Type: application/json" \
  -d '{"question":"Which services depend on the payments v1 API?"}'
Step 8: Build the Next.js Frontend With Shadcn UI
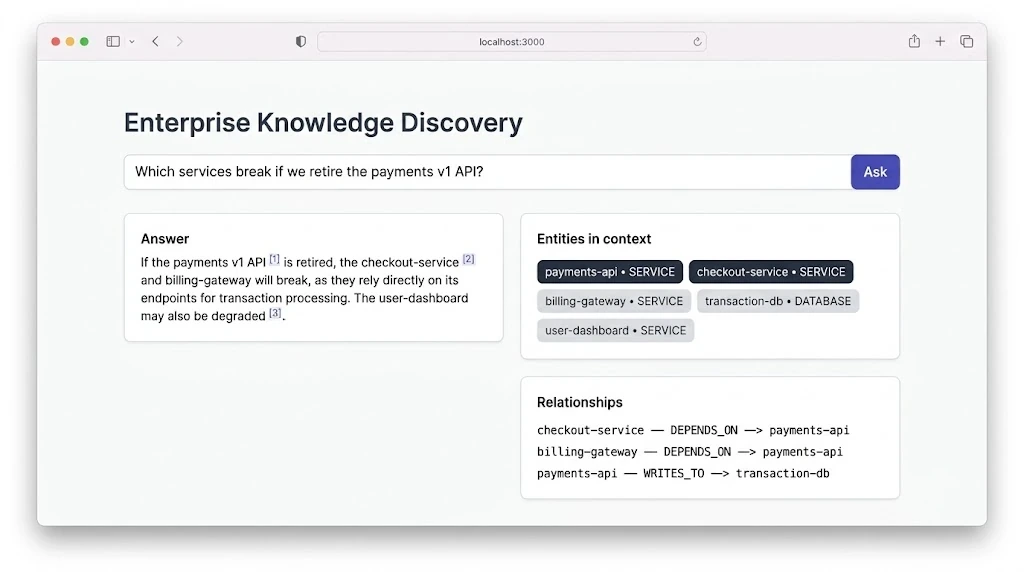
On the front end, the goal is simple: a clean search box, a readable answer, and an honest view of why the system answered that way. Showing entities and relationships builds trust with business users far more than a wall of text.
Create the app and add the components we need:
npx create-next-app@latest web --typescript --tailwind --app
cd web
npx shadcn@latest init
npx shadcn@latest add button input card badge skeleton
Enable standalone output (for slim Docker images) and a dev-time proxy to the API:
// web/next.config.ts
import type { NextConfig } from "next";

const nextConfig: NextConfig = {
  output: "standalone",
  async rewrites() {
    return process.env.NODE_ENV === "development"
      ? [{ source: "/api/:path*", destination: "http://localhost:4000/api/:path*" }]
      : [];
  },
};

export default nextConfig;
Now the main page:
// web/app/page.tsx
"use client";

import { useState } from "react";
import { Button } from "@/components/ui/button";
import { Input } from "@/components/ui/input";
import { Badge } from "@/components/ui/badge";
import { Skeleton } from "@/components/ui/skeleton";
import { Card, CardContent, CardHeader, CardTitle } from "@/components/ui/card";

type QueryResponse = {
  answer: string;
  passages: { id: string; title: string; content: string }[];
  entities: { id: string; name: string; type: string; depth: number }[];
  relationships: { source: string; predicate: string; target: string }[];
};

export default function Home() {
  const [question, setQuestion] = useState("");
  const [data, setData] = useState<QueryResponse | null>(null);
  const [loading, setLoading] = useState(false);
  const [error, setError] = useState<string | null>(null);

  async function ask(e: React.FormEvent) {
    e.preventDefault();
    setLoading(true);
    setError(null);
    try {
      const res = await fetch("/api/query", {
        method: "POST",
        headers: { "Content-Type": "application/json" },
        body: JSON.stringify({ question }),
      });
      if (!res.ok) throw new Error("The request failed. Please try again.");
      setData(await res.json());
    } catch (err) {
      setError(err instanceof Error ? err.message : "Unexpected error");
    } finally {
      setLoading(false);
    }
  }

  return (
    <main className="mx-auto max-w-3xl space-y-6 px-4 py-12">
      <h1 className="text-3xl font-bold tracking-tight">Enterprise Knowledge Discovery</h1>

      <form onSubmit={ask} className="flex gap-2">
        <Input
          value={question}
          onChange={(e) => setQuestion(e.target.value)}
          placeholder="Which services break if we retire the payments v1 API?"
        />
        <Button type="submit" disabled={loading || question.length < 3}>
          {loading ? "Thinking..." : "Ask"}
        </Button>
      </form>

      {error && <p className="text-sm text-red-600">{error}</p>}
      {loading && <Skeleton className="h-40 w-full" />}

      {data && !loading && (
        <div className="space-y-4">
          <Card>
            <CardHeader><CardTitle>Answer</CardTitle></CardHeader>
            <CardContent className="whitespace-pre-wrap">{data.answer}</CardContent>
          </Card>

          <Card>
            <CardHeader><CardTitle>Entities in context</CardTitle></CardHeader>
            <CardContent className="flex flex-wrap gap-2">
              {data.entities.map((e) => (
                <Badge key={e.id} variant={e.depth === 0 ? "default" : "secondary"}>
                  {e.name} · {e.type}
                </Badge>
              ))}
            </CardContent>
          </Card>

          <Card>
            <CardHeader><CardTitle>Relationships</CardTitle></CardHeader>
            <CardContent className="space-y-1 font-mono text-sm">
              {data.relationships.map((r, i) => (
                <div key={i}>{r.source} → {r.predicate} → {r.target}</div>
              ))}
            </CardContent>
          </Card>
        </div>
      )}
    </main>
  );
}
The darker badges are the entities found directly in the seed chunks. The lighter ones were discovered through graph expansion. That small visual cue makes the benefit of Graph RAG instantly obvious to non-technical stakeholders.
Step 9: Containerise the Full Stack With Docker
Multi-stage builds keep images small and keep build tools out of production.
# api/Dockerfile
FROM node:22-alpine AS build
WORKDIR /app
COPY package*.json ./
RUN npm ci
COPY . .
RUN npm run build

FROM node:22-alpine AS runtime
ENV NODE_ENV=production
WORKDIR /app
COPY package*.json ./
RUN npm ci --omit=dev
COPY --from=build /app/dist ./dist
USER node
EXPOSE 4000
CMD ["node", "dist/server.js"]
# web/Dockerfile
FROM node:22-alpine AS build
WORKDIR /app
COPY package*.json ./
RUN npm ci
COPY . .
RUN npm run build

FROM node:22-alpine AS runtime
ENV NODE_ENV=production PORT=3000 HOSTNAME=0.0.0.0
WORKDIR /app
COPY --from=build /app/.next/standalone ./
COPY --from=build /app/.next/static ./.next/static
COPY --from=build /app/public ./public
USER node
EXPOSE 3000
CMD ["node", "server.js"]
Add a build script (tsc -p .) to the API's package.json and a tsconfig.json that outputs to dist. Then tie everything together for production:
# docker-compose.yml
services:
  db:
    image: pgvector/pgvector:pg16
    env_file: .env
    volumes:
      - pgdata:/var/lib/postgresql/data
      - ./db/init.sql:/docker-entrypoint-initdb.d/init.sql
    healthcheck:
      test: ["CMD-SHELL", "pg_isready -U $${POSTGRES_USER}"]
      interval: 10s
      retries: 5
    restart: unless-stopped

  ollama:
    image: ollama/ollama:latest
    volumes:
      - ollama:/root/.ollama
    restart: unless-stopped

  api:
    image: ghcr.io/your-org/graphrag-api:latest
    env_file: .env
    depends_on:
      db:
        condition: service_healthy
    restart: unless-stopped

  web:
    image: ghcr.io/your-org/graphrag-web:latest
    depends_on:
      - api
    restart: unless-stopped

  nginx:
    image: nginx:1.27-alpine
    ports:
      - "80:80"
      - "443:443"
    volumes:
      - ./nginx/default.conf:/etc/nginx/conf.d/default.conf:ro
      - ./certs:/etc/nginx/certs:ro
    depends_on:
      - web
      - api
    restart: unless-stopped

volumes:
  pgdata:
  ollama:
Notice that only Nginx publishes ports. PostgreSQL, Ollama and the API are reachable only on the internal Docker network, which is exactly what you want from a security standpoint.
Step 10: Configure the Nginx Reverse Proxy
Nginx gives you a single public entry point, TLS termination and sane timeouts for slow LLM responses.
# nginx/default.conf
upstream web_app { server web:3000; }
upstream api_app { server api:4000; }

server {
  listen 80;
  server_name graphrag.example.com;
  return 301 https://$host$request_uri;
}

server {
  listen 443 ssl;
  http2 on;
  server_name graphrag.example.com;

  ssl_certificate     /etc/nginx/certs/fullchain.pem;
  ssl_certificate_key /etc/nginx/certs/privkey.pem;

  add_header X-Content-Type-Options nosniff always;
  add_header X-Frame-Options DENY always;
  add_header Referrer-Policy strict-origin-when-cross-origin always;

  gzip on;
  gzip_types application/json text/css application/javascript;

  location /api/ {
    proxy_pass http://api_app;
    proxy_set_header Host $host;
    proxy_set_header X-Real-IP $remote_addr;
    proxy_set_header X-Forwarded-For $proxy_add_x_forwarded_for;
    proxy_set_header X-Forwarded-Proto $scheme;
    proxy_read_timeout 180s; # local LLMs can be slow
  }

  location / {
    proxy_pass http://web_app;
    proxy_set_header Host $host;
    proxy_set_header X-Forwarded-Proto $scheme;
  }
}
For certificates, Let's Encrypt with Certbot on the host is the simplest route. Mount the resulting files into the Nginx container and set up a renewal cron job.
Step 11: Automate CI/CD to AWS With GitHub Actions
The pipeline has two jobs. First, verify the code. Second, build images, push them to GitHub Container Registry and tell the EC2 host to pull and restart.
# .github/workflows/deploy.yml
name: ci-cd

on:
  push:
    branches: [main]

jobs:
  test:
    runs-on: ubuntu-latest
    strategy:
      matrix:
        project: [api, web]
    steps:
      - uses: actions/checkout@v4
      - uses: actions/setup-node@v4
        with:
          node-version: 22
          cache: npm
          cache-dependency-path: ${{ matrix.project }}/package-lock.json
      - run: npm ci
        working-directory: ${{ matrix.project }}
      - run: npm run lint --if-present && npm run build
        working-directory: ${{ matrix.project }}

  deploy:
    needs: test
    runs-on: ubuntu-latest
    permissions:
      contents: read
      packages: write
    steps:
      - uses: actions/checkout@v4
      - uses: docker/login-action@v3
        with:
          registry: ghcr.io
          username: ${{ github.actor }}
          password: ${{ secrets.GITHUB_TOKEN }}

      - uses: docker/build-push-action@v6
        with:
          context: ./api
          push: true
          tags: ghcr.io/${{ github.repository_owner }}/graphrag-api:latest

      - uses: docker/build-push-action@v6
        with:
          context: ./web
          push: true
          tags: ghcr.io/${{ github.repository_owner }}/graphrag-web:latest

      - uses: appleboy/ssh-action@v1
        with:
          host: ${{ secrets.EC2_HOST }}
          username: ubuntu
          key: ${{ secrets.EC2_SSH_KEY }}
          script: |
            cd /opt/graph-rag
            docker compose pull api web
            docker compose up -d
            docker image prune -f
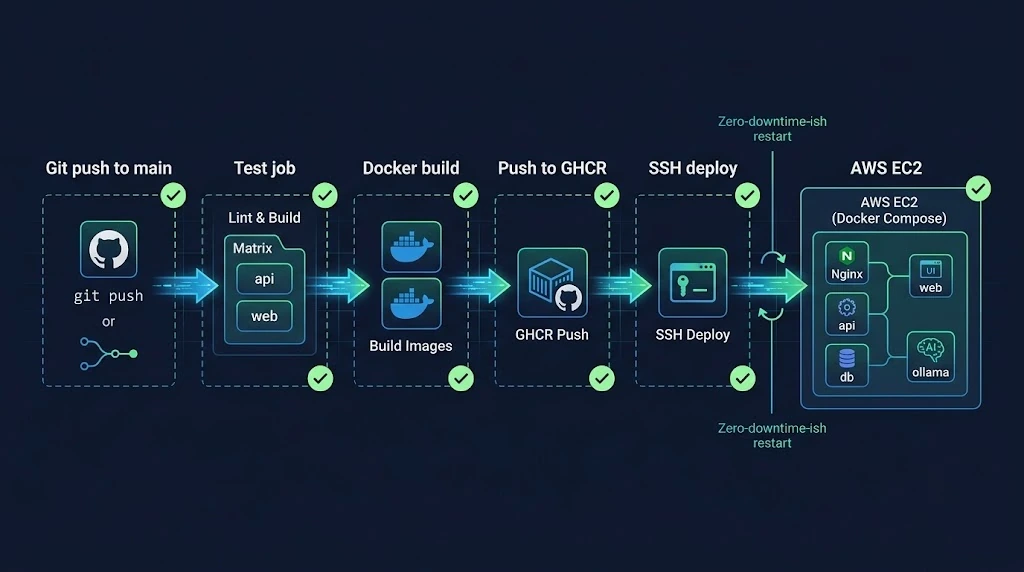
On the AWS side, launch an Ubuntu LTS instance, install Docker and the Compose plugin, open ports 80 and 443 in the security group (and 22 only from your own IP), and clone or copy your compose file and .env into /opt/graph-rag. Be realistic about sizing: an 8B model on CPU works but feels slow, so for interactive use consider a GPU instance, or run Ollama on a separate GPU host and point OLLAMA_BASE_URL at it.
Real-World Example: Incident Impact Analysis
Let me close the loop with a scenario I have seen in different forms at several companies.
An engineering manager uploads the service catalog, three architecture decision records and a year of post-incident reviews. Ingestion extracts roughly a few hundred entities and edges. Later, someone asks:
"If we retire the payments v1 API, which teams need to be notified?"
The vector search surfaces the ADR about the v1 deprecation. The graph expansion then follows DEPENDS_ON edges to checkout-service and billing-worker, and OWNS edges to their teams. The answer lists the teams, cites the passages, and the UI shows the exact path through the graph. Before Graph RAG, this was a half-day of Slack archaeology. Now it is a ten-second question.
Best Practices
- Validate every LLM output. Treat model responses as untrusted input. Zod schemas are your seatbelt.
- Normalise entity names. Canonical names, plus an alias table later on, prevent duplicate nodes from fragmenting your graph.
- Cap traversal depth. Two hops is usually the sweet spot. Beyond that, noise grows faster than signal.
- Keep chunks focused. Around 800 to 1,200 characters with some overlap gives extraction enough context without drowning the model.
- Log retrieval, not just answers. Store which chunks and entities each answer used. It is invaluable for debugging and for audits.
- Version your prompts and models. A model upgrade can change extraction behaviour. Re-run a small evaluation set before promoting it.
- Secure the perimeter. Keep the database and model server off the public internet, rotate secrets, and add per-document access controls if your data is sensitive.
Common Mistakes to Avoid
- Extracting everything. Asking the LLM for every noun in the text produces a noisy, unusable graph. Restrict entity types and demand explicit mentions.
- Holding database transactions open during LLM calls. It exhausts your connection pool under load. Do the slow work first, then write.
- Skipping the evaluation set. Without 20 to 50 real questions and expected answers, you cannot tell whether a change helped or hurt.
- Forgetting indexes on edge tables. Recursive traversal without indexes on
source_idandtarget_iddegrades quickly. - Trusting small models blindly. Tiny models invent relationships. If precision matters, use a larger model for extraction and a smaller one for answering.
- Exposing Ollama publicly. It has no authentication by default. Keep it on the internal network.
🚀 Pro Tips
- Add a re-ranker. After combining seed and graph passages, score them against the question with a lightweight cross-encoder and keep only the best five.
- Use weights as a signal. Sort edges by
weightso repeatedly confirmed relationships appear first in the prompt. - Cache embeddings for repeated questions. A tiny in-memory or Redis cache removes a surprising amount of latency.
- Stream the answer. Server-Sent Events from Express make the UI feel instant even when generation is slow.
- Run extraction as a background job. For large corpora, push ingestion onto a queue so uploads return immediately.
- Try Row-Level Security. PostgreSQL RLS lets you enforce per-team document visibility directly at the database layer.
- Back up with
pg_dumpon a schedule. Your knowledge graph is now a business asset, so treat it like one.
📌 Key Takeaways
- Graph RAG combines semantic similarity with explicit entity relationships, which makes multi-hop questions answerable.
- PostgreSQL, pgvector and recursive CTEs are enough to build a production-grade knowledge graph without adding a new database.
- Ollama and LangChain let you keep the entire AI stack sovereign and private.
- Structured output with Zod makes local-model entity extraction reliable enough to trust.
- Docker Compose, Nginx and GitHub Actions give you a repeatable path from laptop to AWS.
- Showing entities and relationships in the UI builds user trust and makes retrieval explainable.
Conclusion
Graph RAG is not about chasing a trend. It is about acknowledging that enterprise knowledge is relational by nature. People, systems, decisions and incidents are connected, and an assistant that understands those connections gives answers people actually rely on.
The stack we built here is deliberately pragmatic. PostgreSQL does double duty as vector store and graph engine. LangChain and Ollama keep inference private. Express and Next.js give you a clean, typed boundary between the model and the people using it. And Docker, Nginx and GitHub Actions mean you can deploy it on a Tuesday afternoon without holding your breath.
From here, the natural next steps are an entity-resolution pass that merges aliases, community summaries for corpus-wide questions, and an evaluation harness that runs on every pull request. Start small, ingest one real document set, and let your users' questions tell you where the graph needs to grow.
If you build this, I would love to hear what you learn. The best Graph RAG systems I have seen were shaped less by clever algorithms and more by teams who listened closely to the questions their colleagues kept asking.
References
- Edge, D. et al. (2024). From Local to Global: A Graph RAG Approach to Query-Focused Summarization. arxiv.org/abs/2404.16130
- LangChain.js documentation: js.langchain.com
- pgvector repository and documentation: github.com/pgvector/pgvector
- PostgreSQL documentation, WITH Queries (recursive CTEs): postgresql.org/docs/current/queries-with.html
- Ollama documentation: ollama.com
- Next.js documentation: nextjs.org/docs
- Shadcn UI components: ui.shadcn.com
- Docker documentation: docs.docker.com
- Nginx documentation: nginx.org/en/docs
- GitHub Actions documentation: docs.github.com/actions