Introduction
A few years ago, building a real-time mobile app with payments meant weeks of wiring things together before you could even demo a prototype. Authentication, WebSocket plumbing, payment webhooks, deployment scripts: all of it had to exist before the interesting product work could start.
In 2026 the picture looks different. Autonomous coding agents like Claude Code can read your whole repository, propose a plan, edit multiple files, run your tests and iterate on the failures. That doesn't remove the need for engineering judgment. It moves where that judgment is spent. Less time goes into typing boilerplate, and more goes into deciding how the system should behave, where it can fail and how to keep users' money and data safe.
In this guide we'll build the skeleton of a production-grade app together: a live auction marketplace called BidPulse. It's a perfect teaching example because it forces us to solve the hard problems at once:
- Many users see the same state change at the same moment (real-time events).
- Two people can try to win at the same millisecond (concurrency).
- Real money changes hands (payments and security).
- It has to survive launch day traffic (scaling and deployment).
Here is the stack we'll use:
- Mobile: React Native (with Expo), Redux Toolkit, Socket.io client
- Backend: Node.js, Express, MongoDB with Mongoose
- Real-time: Socket.io over WebSockets with a Redis adapter
- Security: JWT access and refresh tokens, Google OAuth
- Payments: Stripe for global users, Razorpay for India
- Infrastructure: AWS, Nginx, Docker, GitHub Actions
- AI workflow: Claude Code throughout
By the end you'll have working patterns you can lift straight into your own project, plus a clear sense of where an AI agent helps most and where you should keep your hands on the wheel.
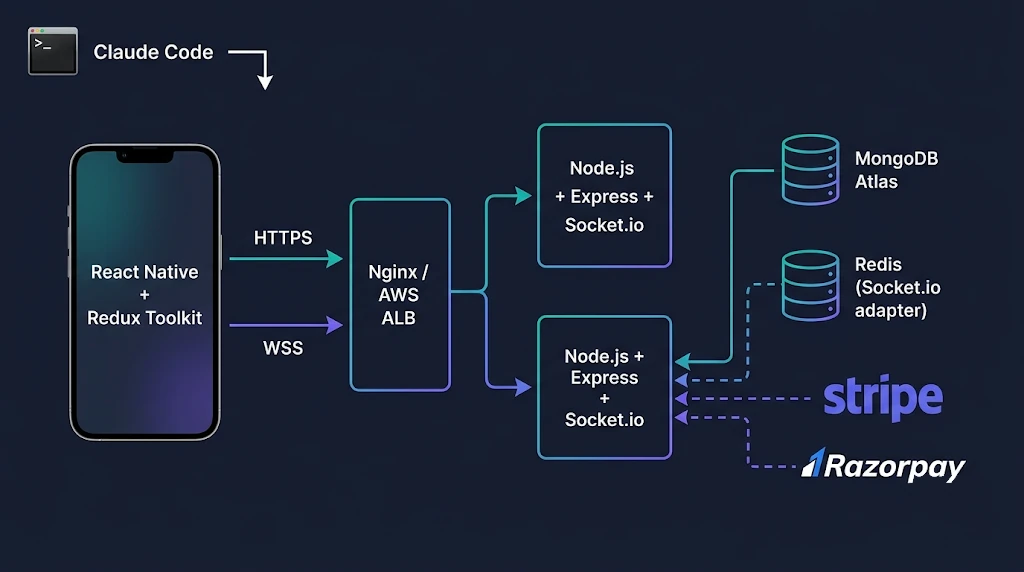
Figure 1: High-level architecture of the BidPulse platform.
Working With Claude Code: Setting Up the Collaboration
Before writing any app code, it's worth spending twenty minutes teaching your AI agent how your project works. Claude Code runs in your terminal, reads your repo and can edit files and run commands. What it doesn't have is your team's unwritten rules, and that is what a CLAUDE.md file is for.
Write a CLAUDE.md that actually helps
Place this file at the root of your repository. Claude Code reads it at the start of a session, so it becomes the standing brief for every task. Keep it short, specific and honest about your conventions.
# BidPulse: Project Guide

## Stack
- apps/mobile: React Native + Expo, TypeScript, Redux Toolkit
- apps/api: Node.js 22, Express, Mongoose, Socket.io
- Package manager: pnpm. Never use npm or yarn.

## Commands
- pnpm --filter api test        # run API unit + integration tests
- pnpm --filter mobile lint     # eslint + tsc
- pnpm --filter api dev         # start API on :4000

## Rules
- All money amounts are integers in the smallest currency unit (cents, paise).
- Never log tokens, card data or full request bodies on payment routes.
- Every socket event handler must validate its payload with zod.
- Database writes that depend on current state must be atomic (findOneAndUpdate).
- New endpoints need a test. No exceptions.

## Do not touch
- infra/terraform/** without asking first
- Any file under .github/workflows/** without a plan
Notice the "Do not touch" section. Boundaries are just as useful as instructions, and they make an autonomous agent much safer to leave alone for a few minutes.
A workflow that works: plan, build, verify
The habit that separates productive Claude Code users from frustrated ones is simple: ask for a plan before asking for code. Switch to plan mode, describe the feature, and read what comes back. If the plan touches files you didn't expect, or skips error handling, correct it now. Fixing a plan costs seconds. Fixing a wrong implementation costs an afternoon.
A typical prompt for our auction feature might look like this:
Add a "place bid" flow. The mobile client emits `bid:place` over Socket.io,
the server validates the payload with zod, atomically updates the auction in
MongoDB only if the bid is higher than the current one, and broadcasts
`bid:updated` to everyone in the auction room. Include integration tests
for two concurrent bids. Plan first, don't write code yet.
Once you approve the plan, let it implement, run the tests and fix its own failures. Then do what you'd do with any teammate's pull request: read the diff.
Hooks and subagents for guardrails
Two features are worth knowing about as your project grows:
- Hooks let you run your own commands at specific moments, for example running the linter after every file edit, or blocking edits to protected paths. This turns your conventions into enforced checks instead of polite requests.
- Subagents let you delegate focused jobs, such as a security reviewer that only looks for auth and payment mistakes, so the main conversation stays uncluttered.
A security-review subagent pays for itself quickly in a project that handles payments. Ask it to review every diff touching routes/payments and middleware/auth before you merge.
Designing the Backend: Node.js and MongoDB
Let's start from the data, because the shape of your collections drives everything else. Here is a trimmed-down structure for the API:
apps/api/src/
├── config/          # env parsing, db connection
├── middleware/      # auth, rate limiting, error handler
├── models/          # Mongoose schemas
├── routes/          # REST endpoints (auth, auctions, payments)
├── sockets/         # Socket.io setup and event handlers
├── services/        # Stripe, Razorpay, token helpers
└── server.ts
Modeling auctions for concurrency
The Auction schema is where concurrency problems are won or lost. We keep currentBid on the document itself so we can update it atomically.
// models/Auction.ts
import { Schema, model, Types } from "mongoose";

const auctionSchema = new Schema(
  {
    title: { type: String, required: true, trim: true },
    seller: { type: Types.ObjectId, ref: "User", required: true },
    startingBid: { type: Number, required: true, min: 0 }, // smallest unit
    currentBid: { type: Number, required: true, min: 0 },
    highBidder: { type: Types.ObjectId, ref: "User", default: null },
    bidCount: { type: Number, default: 0 },
    currency: { type: String, enum: ["usd", "inr"], required: true },
    status: {
      type: String,
      enum: ["scheduled", "live", "ended", "paid"],
      default: "scheduled",
      index: true,
    },
    endsAt: { type: Date, required: true, index: true },
  },
  { timestamps: true }
);

export const Auction = model("Auction", auctionSchema);
Two small details matter here. Amounts are stored as integers in the smallest currency unit (cents or paise) to avoid floating-point rounding bugs. And we index status and endsAt because the "live auctions" query will be your hottest read.
The server entry point
// server.ts
import "dotenv/config";
import http from "http";
import express from "express";
import helmet from "helmet";
import cors from "cors";
import mongoose from "mongoose";
import { initSockets } from "./sockets";
import authRoutes from "./routes/auth";
import paymentRoutes, { stripeWebhookRouter } from "./routes/payments";

const app = express();
app.set("trust proxy", 1); // we sit behind Nginx

app.use(helmet());
app.use(cors({ origin: process.env.ALLOWED_ORIGINS?.split(",") }));

// The Stripe webhook needs the raw body, so mount it BEFORE express.json()
app.use("/webhooks", stripeWebhookRouter);

app.use(express.json({ limit: "100kb" }));
app.use("/auth", authRoutes);
app.use("/payments", paymentRoutes);

const server = http.createServer(app);
initSockets(server);

await mongoose.connect(process.env.MONGO_URI!);
server.listen(4000, () => console.log("API listening on :4000"));
The trust proxy setting and the order of the webhook route are both common sources of confusion. We'll return to them in the mistakes section.
Securing the App: JWT and OAuth Authentication
Security is the area where I'd ask you to slow down and review Claude Code's work most carefully. It can write auth code quickly, but a subtle mistake here is expensive.
Short-lived access tokens, rotating refresh tokens
The pattern that holds up well on mobile is:
- A short-lived access token (10 to 15 minutes) sent with each API call.
- A long-lived refresh token (days or weeks) used only to get a new access token.
- Rotation: every refresh issues a brand new refresh token and invalidates the old one. If an old one is ever reused, you treat the whole session as compromised.
// services/tokens.ts
import jwt from "jsonwebtoken";
import crypto from "crypto";

export function signAccessToken(userId: string) {
  return jwt.sign({ sub: userId }, process.env.JWT_ACCESS_SECRET!, {
    expiresIn: "15m",
    issuer: "bidpulse-api",
  });
}

export function newRefreshToken() {
  const raw = crypto.randomBytes(48).toString("base64url");
  // Store only the hash in MongoDB, never the raw token
  const hash = crypto.createHash("sha256").update(raw).digest("hex");
  return { raw, hash };
}
Storing only a hash of the refresh token means a database leak doesn't hand attackers working sessions. On the device, keep both tokens in secure storage (expo-secure-store), not in AsyncStorage.
Adding Google OAuth the safe way
For social login, let the mobile app obtain a Google ID token using the PKCE-based flow from expo-auth-session, then send that token to your server. Your server's job is to verify it, find or create the user, and issue your own tokens.
// routes/auth.ts (excerpt)
import { OAuth2Client } from "google-auth-library";

const google = new OAuth2Client();

router.post("/google", async (req, res) => {
  const { idToken } = req.body;

  const ticket = await google.verifyIdToken({
    idToken,
    audience: process.env.GOOGLE_CLIENT_IDS!.split(","), // iOS + Android + web
  });
  const payload = ticket.getPayload();

  if (!payload?.email_verified) {
    return res.status(401).json({ message: "Email not verified" });
  }

  const user = await User.findOneAndUpdate(
    { email: payload.email },
    { $setOnInsert: { name: payload.name, avatar: payload.picture } },
    { upsert: true, new: true }
  );

  return res.json(await issueSession(user.id));
});
The two lines that matter most are the audience check, which makes sure the token was minted for your app, and the email_verified check. Skipping either is a classic way to end up with account takeover bugs.
Real-Time Magic: Socket.io and WebSockets
Now for the part users actually feel. Socket.io builds on WebSockets and adds reconnection, rooms, acknowledgements and a fallback transport, which is a big deal on mobile networks that drop constantly.
Authenticate the handshake, not just the REST calls
A very common oversight is protecting your REST routes carefully and then leaving the socket wide open. Verify the JWT during the connection handshake so unauthenticated clients never get a live connection at all.
// sockets/index.ts
import { Server } from "socket.io";
import { createAdapter } from "@socket.io/redis-adapter";
import { createClient } from "redis";
import jwt from "jsonwebtoken";
import { z } from "zod";
import { Auction } from "../models/Auction";

export function initSockets(httpServer: import("http").Server) {
  const io = new Server(httpServer, {
    transports: ["websocket"], // skip long-polling, simpler to scale
    cors: { origin: process.env.ALLOWED_ORIGINS?.split(",") },
    pingInterval: 25000,
    pingTimeout: 20000,
  });

  // Redis adapter lets multiple Node instances share events
  const pub = createClient({ url: process.env.REDIS_URL });
  const sub = pub.duplicate();
  Promise.all([pub.connect(), sub.connect()]).then(() => {
    io.adapter(createAdapter(pub, sub));
  });

  io.use((socket, next) => {
    try {
      const token = socket.handshake.auth?.token;
      const decoded = jwt.verify(token, process.env.JWT_ACCESS_SECRET!) as { sub: string };
      socket.data.userId = decoded.sub;
      next();
    } catch {
      next(new Error("unauthorized"));
    }
  });

  const bidSchema = z.object({
    auctionId: z.string().length(24),
    amount: z.number().int().positive(),
  });

  io.on("connection", (socket) => {
    socket.on("auction:join", (auctionId: string) => {
      socket.join(`auction:${auctionId}`);
    });

    socket.on("bid:place", async (raw, ack) => {
      const parsed = bidSchema.safeParse(raw);
      if (!parsed.success) return ack?.({ ok: false, error: "Invalid payload" });

      const { auctionId, amount } = parsed.data;

      // Atomic: only succeeds if the auction is live and the bid is higher
      const updated = await Auction.findOneAndUpdate(
        {
          _id: auctionId,
          status: "live",
          endsAt: { $gt: new Date() },
          currentBid: { $lt: amount },
        },
        {
          $set: { currentBid: amount, highBidder: socket.data.userId },
          $inc: { bidCount: 1 },
        },
        { new: true }
      );

      if (!updated) return ack?.({ ok: false, error: "Bid too low or auction closed" });

      io.to(`auction:${auctionId}`).emit("bid:updated", {
        auctionId,
        currentBid: updated.currentBid,
        highBidder: String(updated.highBidder),
        bidCount: updated.bidCount,
      });

      ack?.({ ok: true });
    });
  });

  return io;
}
Take a moment with the findOneAndUpdate call, because it is the heart of the feature. The conditions in the filter (status: "live", endsAt in the future, currentBid lower than the new amount) and the update happen as one atomic operation inside MongoDB. If two users bid 500 at the same instant, exactly one of them matches the filter. The other gets a clean rejection. No locks, no race conditions, no "read then write" gap.
Why the Redis adapter matters
The moment you run more than one Node.js instance, a user connected to server A won't see events emitted on server B unless the instances share a message bus. The Redis adapter does exactly that, so io.to(room).emit(...) reaches every connected client in the cluster. Add it from day one; retrofitting it during an incident is no fun.
Managing State: React Native and Redux Toolkit
On the client, we want screens that simply read state and dispatch actions. The socket connection should live in one place, and Redux middleware is a clean home for it.
The auction slice
// store/auctionSlice.ts
import { createSlice, PayloadAction } from "@reduxjs/toolkit";

type AuctionState = {
  currentBid: number;
  highBidder: string | null;
  bidCount: number;
  connection: "idle" | "connected" | "disconnected";
};

const initialState: AuctionState = {
  currentBid: 0,
  highBidder: null,
  bidCount: 0,
  connection: "idle",
};

const auctionSlice = createSlice({
  name: "auction",
  initialState,
  reducers: {
    connectionChanged(state, action: PayloadAction<AuctionState["connection"]>) {
      state.connection = action.payload;
    },
    bidUpdated(state, action: PayloadAction<Omit<AuctionState, "connection">>) {
      Object.assign(state, action.payload);
    },
  },
});

export const { connectionChanged, bidUpdated } = auctionSlice.actions;
export default auctionSlice.reducer;
A socket middleware that owns the connection
// store/socketMiddleware.ts
import { Middleware } from "@reduxjs/toolkit";
import { io, Socket } from "socket.io-client";
import * as SecureStore from "expo-secure-store";
import { connectionChanged, bidUpdated } from "./auctionSlice";

let socket: Socket | null = null;

export const socketMiddleware: Middleware = (store) => (next) => (action: any) => {
  switch (action.type) {
    case "socket/connect": {
      SecureStore.getItemAsync("accessToken").then((token) => {
        socket = io(process.env.EXPO_PUBLIC_WS_URL!, {
          transports: ["websocket"],
          auth: { token },
          reconnectionDelayMax: 5000,
        });

        socket.on("connect", () => store.dispatch(connectionChanged("connected")));
        socket.on("disconnect", () => store.dispatch(connectionChanged("disconnected")));
        socket.on("bid:updated", (data) => store.dispatch(bidUpdated(data)));
      });
      break;
    }
    case "socket/joinAuction":
      socket?.emit("auction:join", action.payload);
      break;
    case "socket/placeBid":
      socket?.emit("bid:place", action.payload, (res: { ok: boolean; error?: string }) => {
        if (!res.ok) console.warn("Bid rejected:", res.error);
      });
      break;
    case "socket/disconnect":
      socket?.disconnect();
      socket = null;
      break;
  }
  return next(action);
};
With this in place, a screen needs almost no networking knowledge. It dispatches socket/joinAuction when it mounts, reads currentBid from the store, and dispatches socket/placeBid when the user taps the button. When the app goes to the background, dispatch socket/disconnect, and reconnect when it returns to the foreground. This saves battery and avoids zombie connections.
One extra tip: after a reconnect, re-join your rooms and re-fetch the latest auction state over REST. Socket events are great for live updates, but they are not a guaranteed history. A user whose phone lost signal for ten seconds will have missed events.
Monetizing the Platform: Stripe and Razorpay
Money is where we get strict. The golden rule is simple and worth repeating: the mobile app can ask for a payment, but only your server decides whether it succeeded.
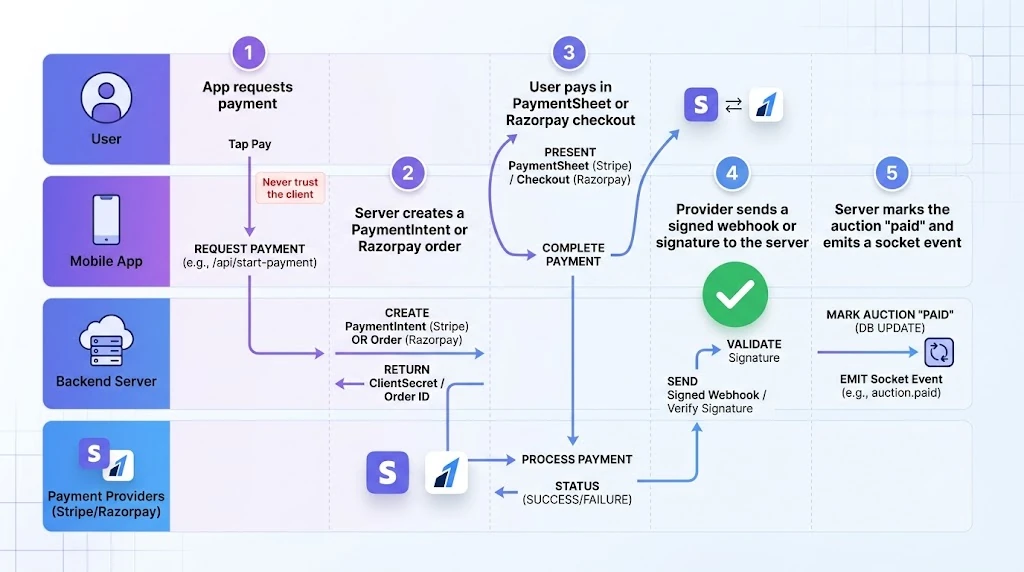
Figure 2: Server-confirmed payment flow for Stripe and Razorpay.
Stripe: PaymentIntents and webhooks
On the server, create a PaymentIntent for the auction winner. Always calculate the amount from your own database, never from a number the client sends.
// routes/payments.ts (Stripe part)
import Stripe from "stripe";
import express, { Router } from "express";

const stripe = new Stripe(process.env.STRIPE_SECRET_KEY!);
const router = Router();

router.post("/stripe/intent", requireAuth, async (req, res) => {
  const auction = await Auction.findById(req.body.auctionId);

  if (!auction || auction.status !== "ended" || String(auction.highBidder) !== req.user.id) {
    return res.status(403).json({ message: "Not allowed" });
  }

  const intent = await stripe.paymentIntents.create(
    {
      amount: auction.currentBid, // already in cents
      currency: auction.currency,
      automatic_payment_methods: { enabled: true },
      metadata: { auctionId: auction.id, userId: req.user.id },
    },
    { idempotencyKey: `auction-${auction.id}` }
  );

  res.json({ clientSecret: intent.client_secret });
});

export default router;

// Webhook: needs the RAW body to verify the signature
export const stripeWebhookRouter = Router();

stripeWebhookRouter.post(
  "/stripe",
  express.raw({ type: "application/json" }),
  async (req, res) => {
    let event: Stripe.Event;
    try {
      event = stripe.webhooks.constructEvent(
        req.body,
        req.headers["stripe-signature"] as string,
        process.env.STRIPE_WEBHOOK_SECRET!
      );
    } catch {
      return res.status(400).send("Invalid signature");
    }

    if (event.type === "payment_intent.succeeded") {
      const intent = event.data.object as Stripe.PaymentIntent;
      await Auction.updateOne(
        { _id: intent.metadata.auctionId, status: "ended" },
        { $set: { status: "paid" } }
      );
    }

    res.json({ received: true });
  }
);
On the React Native side, the official Stripe SDK gives you a ready-made PaymentSheet, which handles card entry, Apple Pay and Google Pay, 3D Secure and a lot of compliance headaches for you.
import { useStripe } from "@stripe/stripe-react-native";

function PayButton({ auctionId }: { auctionId: string }) {
  const { initPaymentSheet, presentPaymentSheet } = useStripe();

  const pay = async () => {
    const { clientSecret } = await api.post("/payments/stripe/intent", { auctionId });

    const init = await initPaymentSheet({
      merchantDisplayName: "BidPulse",
      paymentIntentClientSecret: clientSecret,
    });
    if (init.error) return alert(init.error.message);

    const result = await presentPaymentSheet();
    if (result.error) return alert(result.error.message);

    // Don't mark it paid locally. Wait for the server to confirm via webhook.
  };

  return <Button title="Pay now" onPress={pay} />;
}
Razorpay: orders and signature verification
For customers in India, Razorpay gives you UPI, netbanking and wallets that card-only flows simply can't match. The shape is similar: create an order on the server, let the app collect payment, then verify the signature on the server.
// routes/payments.ts (Razorpay part)
import Razorpay from "razorpay";
import crypto from "crypto";

const razorpay = new Razorpay({
  key_id: process.env.RAZORPAY_KEY_ID!,
  key_secret: process.env.RAZORPAY_KEY_SECRET!,
});

router.post("/razorpay/order", requireAuth, async (req, res) => {
  const auction = await Auction.findById(req.body.auctionId);
  // ...same ownership and status checks as the Stripe route...

  const order = await razorpay.orders.create({
    amount: auction!.currentBid, // paise
    currency: "INR",
    receipt: `auction_${auction!.id}`,
  });

  res.json({ orderId: order.id, keyId: process.env.RAZORPAY_KEY_ID });
});

router.post("/razorpay/verify", requireAuth, async (req, res) => {
  const { orderId, paymentId, signature } = req.body;

  const expected = crypto
    .createHmac("sha256", process.env.RAZORPAY_KEY_SECRET!)
    .update(`${orderId}|${paymentId}`)
    .digest("hex");

  const valid =
    expected.length === signature?.length &&
    crypto.timingSafeEqual(Buffer.from(expected), Buffer.from(signature));

  if (!valid) return res.status(400).json({ message: "Signature mismatch" });

  // Mark paid, ideally also confirmed via Razorpay's webhook
  res.json({ ok: true });
});
A neat design choice for a global app is a small provider-selection function: if the user's profile country is India, offer Razorpay; otherwise offer Stripe. Your Auction model and "paid" state stay identical, and only the checkout step differs.
Deployment: AWS, Nginx and a Modern CI/CD Pipeline
A great app that falls over under load is still a bad app. Let's make the deployment boring in the best way.
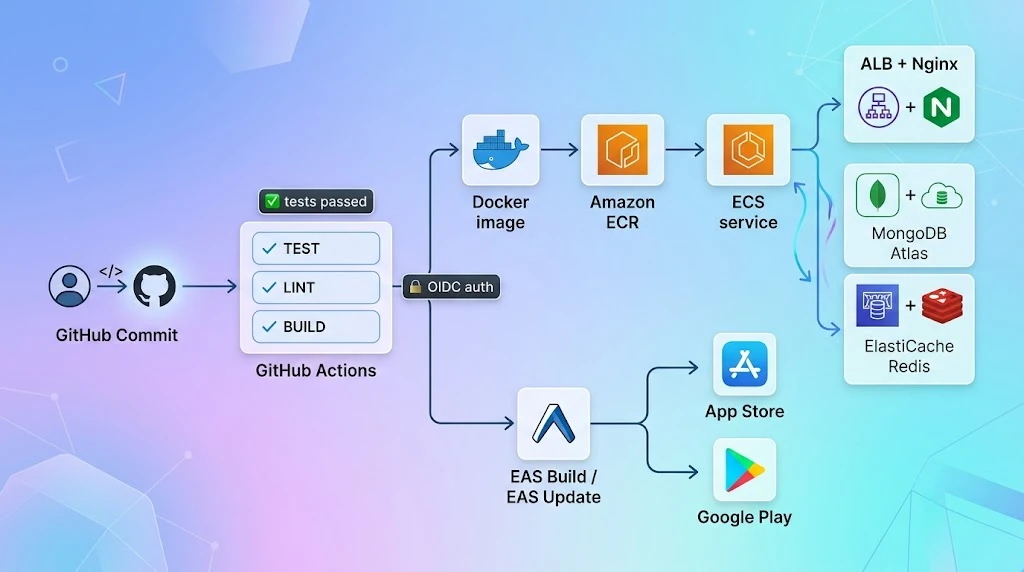
Figure 3: CI/CD pipeline from commit to production on AWS.
Nginx as a WebSocket-aware reverse proxy
Nginx doesn't forward WebSocket upgrade headers by default, which is a favorite source of "works on my machine, fails in production" bugs. This configuration handles it properly:
map $http_upgrade $connection_upgrade {
    default upgrade;
    ''      close;
}

upstream bidpulse_api {
    server 127.0.0.1:4000;
    server 127.0.0.1:4001;
    keepalive 32;
}

server {
    listen 443 ssl http2;
    server_name api.bidpulse.app;

    ssl_certificate     /etc/letsencrypt/live/api.bidpulse.app/fullchain.pem;
    ssl_certificate_key /etc/letsencrypt/live/api.bidpulse.app/privkey.pem;

    location /socket.io/ {
        proxy_pass http://bidpulse_api;
        proxy_http_version 1.1;
        proxy_set_header Upgrade $http_upgrade;
        proxy_set_header Connection $connection_upgrade;
        proxy_set_header Host $host;
        proxy_set_header X-Forwarded-For $proxy_add_x_forwarded_for;
        proxy_set_header X-Forwarded-Proto $scheme;
        proxy_read_timeout 120s;   # longer than Socket.io pingInterval + pingTimeout
    }

    location / {
        proxy_pass http://bidpulse_api;
        proxy_set_header Host $host;
        proxy_set_header X-Forwarded-For $proxy_add_x_forwarded_for;
        proxy_set_header X-Forwarded-Proto $scheme;
    }
}
Because we configured Socket.io for the WebSocket transport only, we don't need sticky sessions here. If you decide to allow the long-polling fallback, add ip_hash; to the upstream block or use stickiness at your load balancer.
A CI/CD pipeline that tests before it ships
This GitHub Actions workflow runs tests on every push and deploys only from main:
name: ci-cd
on:
  push:
    branches: [main]
  pull_request:

jobs:
  test:
    runs-on: ubuntu-latest
    services:
      mongo:
        image: mongo:7
        ports: ["27017:27017"]
    steps:
      - uses: actions/checkout@v4
      - uses: pnpm/action-setup@v4
      - uses: actions/setup-node@v4
        with:
          node-version: 22
          cache: pnpm
      - run: pnpm install --frozen-lockfile
      - run: pnpm --filter api test
      - run: pnpm --filter mobile lint

  deploy-api:
    needs: test
    if: github.ref == 'refs/heads/main'
    runs-on: ubuntu-latest
    permissions:
      id-token: write   # OIDC, so no long-lived AWS keys in secrets
      contents: read
    steps:
      - uses: actions/checkout@v4
      - uses: aws-actions/configure-aws-credentials@v4
        with:
          role-to-assume: ${{ secrets.AWS_DEPLOY_ROLE_ARN }}
          aws-region: ap-south-1
      - uses: aws-actions/amazon-ecr-login@v2
      - run: |
          docker build -t $ECR_REPO:${{ github.sha }} apps/api
          docker push $ECR_REPO:${{ github.sha }}
        env:
          ECR_REPO: ${{ secrets.ECR_REPO }}
      # then update the ECS service to the new image tag
For the mobile app itself, use EAS Build and EAS Update from Expo to produce store builds and ship over-the-air JavaScript fixes. Trigger a build on version tags, and keep OTA updates for small, safe changes.
Best Practices
Here's a distilled checklist from everything above:
- Plan first with your AI agent. Review the plan, then review the diff. Never merge code you haven't read.
- Encode your conventions in
CLAUDE.mdand enforce the important ones with hooks and tests. - Authenticate sockets at the handshake and validate every event payload with a schema library like zod.
- Make state changes atomic. If correctness depends on "check, then write", move both into one database operation.
- Store money as integers in the smallest unit, and always calculate amounts server-side.
- Confirm payments server-side through webhooks or signature verification, and make webhook handlers idempotent.
- Use short-lived access tokens with rotating refresh tokens, stored in secure device storage.
- Scale out early with the Redis adapter, health checks and at least two app instances behind your load balancer.
- Rate limit login, bid and payment endpoints. Bots love auctions.
- Monitor socket connection counts, event latency, payment failure rates and webhook delivery. You can't fix what you can't see.
Common Mistakes to Avoid
I've seen each of these in real projects, some of them in my own:
- Parsing the Stripe webhook body as JSON before verifying it. The signature is computed over the raw bytes. If
express.json()runs first, verification fails. Mount the webhook route before the JSON parser, as we did. - Trusting the client's price. If your endpoint accepts
amountfrom the request body, someone will eventually pay one cent for a laptop. - Forgetting
trust proxybehind Nginx or a load balancer. Without it, rate limiting sees every user as the same IP address, which either blocks everyone or protects no one. - Opening sockets without authentication because the REST API was locked down and "the socket is just for display." Sockets can carry mutations too.
- Checking-then-writing in separate queries. Reading the current bid, comparing in JavaScript, then saving is a race condition waiting for a busy auction.
- Storing tokens in AsyncStorage. It is unencrypted. Use the Keychain and Keystore through
expo-secure-store. - Letting an AI agent run unsupervised on infrastructure code. Agents are brilliant at app code and risky around Terraform, IAM and production secrets. Fence those areas off.
- Skipping reconnection logic. Mobile networks drop all the time. Handle reconnects, re-join rooms and re-sync state from the API.
- Hardcoding secrets in the app bundle. Anything shipped inside a mobile app can be extracted. Only publishable keys (like Stripe's publishable key or Razorpay's key ID) belong on the device.
🚀 Pro Tips
- Give Claude Code a way to check its own work. Tests, a type checker and a linter let it iterate on failures by itself. An agent without feedback is just guessing faster.
- Keep tasks small and specific. "Add
bid:placewith these rules and tests" works far better than "build the auction feature." - Use a second pair of eyes. Run a dedicated security-review pass on auth and payment diffs, either with a subagent or a human teammate.
- Write idempotent webhook handlers. Providers retry. Handling
payment_intent.succeededtwice should be harmless. - Test the ugly paths. Simulate two simultaneous bids, a dropped connection mid-payment and a delayed webhook. These are the scenarios that hurt in production.
- Load test your sockets before launch. Tools like Artillery can simulate thousands of connections so you find your limits on your schedule, not your users'.
- Version your socket events (for example
bid:updated:v2) so older app versions keep working while you roll out changes. - Use feature flags for payments. Being able to switch off a provider without shipping a new app build is a lifesaver.
📌 Key Takeaways
- Claude Code is most powerful when you give it context (
CLAUDE.md), boundaries (hooks and protected paths) and a plan-first workflow. - Real-time correctness comes from server-side validation and atomic database operations, not from client-side checks.
- Authenticate both your REST API and your WebSocket handshake with short-lived JWTs and rotating refresh tokens.
- Stripe and Razorpay both follow the same principle: the server creates the charge, the client collects payment, the server verifies the result.
- A production-ready deployment needs a WebSocket-aware Nginx config, a Redis adapter for multi-instance scaling and a CI/CD pipeline that runs tests before deploying.
- AI agents accelerate the typing. Your engineering judgment is still what makes the system trustworthy.
Conclusion
Building a real-time, payment-enabled mobile app used to demand a big team and a long runway. With a well-briefed AI agent, a solid stack and a handful of disciplined patterns, a small team can now reach a credible, scalable product much faster.
But the lesson of this guide isn't "let the AI do it." It's that the fundamentals still decide whether your app is good: atomic writes, verified payments, authenticated sockets, and a deployment you can trust. Claude Code helps you reach those fundamentals sooner, and it's most valuable when you're clear about what "correct" looks like.
If you're starting from scratch, my suggestion is to build the smallest vertical slice first: one authenticated user, one live auction, one real-time bid and one test payment. Get that working end to end, deploy it behind Nginx, and then grow outward. Every feature you add after that will rest on a foundation you've actually tested.
Happy building, and may your sockets stay connected.
References
- Claude Code documentation: Anthropic
- React Native documentation
- Expo documentation: EAS Build and EAS Update
- Redux Toolkit documentation
- Socket.io v4 documentation
- Socket.io Redis adapter guide
- MongoDB manual: findOneAndUpdate and atomic operations
- Stripe: Accept a payment in React Native
- Stripe: Webhooks and signature verification
- Razorpay: Node.js server integration
- Google Identity: Verify an ID token on your backend
- Nginx: WebSocket proxying
- OWASP API Security Project